Saturday, July 31, 2010
Mini Breakfast Frittatas
Cookies Make the House a Home
I've been reading a lot about decorating with royal icing and have been dying to try it myself, but I needed a purpose to get myself in gear. Well, it just so happens one of my best friends of over 15 years is getting married next weekend. So I offered to make favors for the rehearsal dinner. I knew I needed to get in some serious practice first though. So I made a batch of cookies, made my "cookie cutters", and made a batch of royal icing and went to town decorating! It was such a fun baking adventure !This same friend of mine and her soon-to-be hubby happened to be buying their first home the same day I was practicing, so I knew just what to do with the extra dough and icing. I first saw this post a few weeks before on Annie's Eats and this was the perfect excuse to make these cookies. I am truly in love with royal icing !
Sugar Cookie Recipe (taken from Annie's Eats)
These cookies were prefect for decorating because they don't spread)
1 cup butter
1 cup powdered sugar
1 egg, beaten
1 ½ t. almond extract
1 t. vanilla
1 t. salt
2 ½ c. sifted flour
1. Cream butter on medium. Add powdered sugar.
2. Add in egg, almond extract(I was out of almond so I doubled the vanilla), vanilla, salt and flour. Let chill in fridge until firm.
3. Roll to about ¼” thickness on well-floured surface.
4. Cut with cookie cutters. Or you can do what I did and trace your design on a piece of card stock and cut it out. Then using a paring knife, go around the edge of your design. Place on greased cookie sheets.
5. Bake at 375° for 8-10 min. Cookies should not brown.
Royal Icing Recipe (also taken from Annie's Eats)
4 cups powdered sugar, sifted
2 tbsp. meringue powder
5 tbsp. water
1. In a stand mixer, mix all ingredients together with a paddle attachment on low for about 10 minutes.
2. Place icing into air-tight containers, depending on how many colors you will need.
3. Add a very small amount of water to each container and stir it in well. When it has reached the consistency desired for piping, you can add food coloring if desired. I used the Wilton gel food coloring, which was wonderful.
4. Fill pastry bags and pipe around the outside edges of each cookie or any area you want to partition off. Let set for about one hour.
5. When finished piping, thin out the rest of your icing for flooding by adding small amounts of water until it reaches the desired consistency. The icing should be able to drop off a spoon and smooth back in with the rest of icing within 10 seconds.
6. Fill plastic squeeze bottles with flooded icing. Fill the desired area with icing and use toothpick to pull icing to the edges and fully cover the entire area.
7. Let set for 12-24 hours. Then decorate or trim with remaining icing. If it is too thin, you can add more powdered sugar to thicken it and pipe on decorations.
Friday, July 30, 2010
Cookie Sandwiched Cheesecakes
This is quick and simple variation of my cheesecake recipe made into cute little sandwiches. It's very easily adaptable to your own tastes. I'm a fan of chocolate chip cookies (the chewy kind) and Oreo's too! The only way to improve on this recipe would have been to have my own chocolate chip cookies or be really brave and make my own Oreos. Someday...
But for now, please enjoy these yummy handheld snacks! They are a perfect kid-friendly version of cheesecake!
1 1/2 lbs cream cheese
1 1/3 cups sugar
5 large eggs
16 ounces sour cream
1/4 cup flour
2 teaspoons vanilla extract
1 teaspoons lemon juice
1 package of chewy chocolate chip cookies
1 package of Oreos (or any other cookies you like)
1. In a mixing bowl, beat cream cheese until fluffy.
2. Add sugar and continue beating on low.
3. Add eggs one a time and keep on low speed.
4. Add flour, lemon juice, and vanilla.
5. Stir in sour cream.
6. Place cupcake liners in pan. Put one half of an oreo(icing side up) or chocolate chip cookie(flat side facing up) in each liner.
7. Spoon cheesecake filling on top till just about full.
8. Top with corresponding cookie to finish.
9. Bake on 325 for 15 minutes.
10. I also took used some chopped Oreos as topping and some combined in the filling for a slightly different approach in some sandwiches.
Wednesday, July 28, 2010
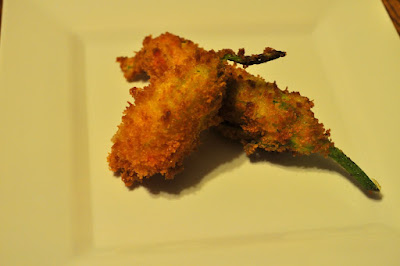
Fried Zucchini Blossoms
Zucchini blossoms tend to get overlooked in the the average kitchen, but we are fans of these tasty flowers, especially when they are stuffed and fried. Really, what isn't good when it's stuffed and fried? These are no exception! This recipe is adapted from Kevin Kohler, Chef of Cafe Panache.
15 Zucchini blossoms, male flowers
1/2 cup ricotta cheese
1/4 cup shredded mozzarella
3 tbsp grated Pecorino Romano
2 tbsp mascarpone cheese
salt and pepper to taste
1 cup flour
2 eggs
1 cup of panko bread crumbs
oil for frying
1. In a small bowl combine the cheeses, salt, and pepper. Spoon into a pastry bag.
2. Open the flowers, wipe clean with a damp paper towel, and remove the stamens.
3. Now the tricky part! Open your flowers wide, but be very gentle. These flowers are quite fragile and if you rip it, the cheese will come out when frying.
4. Pipe cheese mixture into flowers and then twist tops and secure with toothpick.
5. Place flour, eggs, and panko in three separate shallow bowls. Beat the eggs with a fork.
6. Dip each blossom in the flour first(be sure to tap off the excess), eggs, and then panko.
7. You can refrigerate them now to make flowers firm or you can start frying.
8. Heat enough oil to fry in to about 375 degrees. Fry about 20 seconds per side.
9. Drain on paper towels and serve immediately with tomato sauce and we added some grilled bread drizzled with olive oil.
Tuesday, July 27, 2010
Black Forest Cream of Musroom Soup
1/2 cup dried mixed mushrooms (optional)
2 pounds mixed fresh mushrooms (button, shiitake, cremini), sliced 1/4" thick
2 cloves garlic, minced or pressed
2 teaspoons herb de Provence
2 carrots, coarsely chopped
3 cups cauliflower florets, cut into small pieces
1 cup chopped organic celery
3 leeks, cut into 1/2 inch rounds
4 tablespoons no salt seasoning
5 cups carrot juice
3 cups water
1/4 cup raw cashews
1 tablespoon lemon juice
1 tablespoon chopped fresh thyme
2 teaspoons chopped fresh rosemary
2 cans white beans, northern, navy, or cannellini (no salt)
1 5-oz bag organic baby spinach
1/4 cup chopped fresh parsley
Instructions:
If using dried mushrooms, soak them in hot water to cover for 30 minutes and cut in pieces.
Heat 1/8 cup water in large saute pan. Water sauté the fresh and dried mushrooms, garlic and dried herbs until tender and fragrant. Set aside.
In large soup pot, bring carrot juice, water, carrots, cauliflower, celery, leeks and seasoning to a boil. Reduce heat and simmer until vegetables are tender, about 30 minutes.
Puree 1/2 vegetable soup in high powered blender, adding cashews, lemon juice, and fresh herbs. Blend until smooth and creamy.
Add pureed soup back to soup pot along with mushrooms, beans, and spinach. Heat until spinach is wilted.
Serve garnished with fresh chopped parsley.
Friday, July 9, 2010
Sugared Flowers
Monday, July 5, 2010
Red, White, and Blue Berries
Taken from http://www.ehow.com/how_2259361_cheesecake-stuffed-strawberries.html
These cheesecake stuffed berries are perfect for the 4th of July or any other time in my opinion!
About 24 strawberries
16 oz cream cheese (softened)
1 cup confectioner's sugar
2 tsp vanilla
1 pint blueberries
1. Rinse and dry strawberries and blueberries. Using a melon baller, 1/4 tsp scoop, or a small cookie scoop, hull out the inside of the strawberry. Be sure not to remove too much of the insides or the sides will be too thin to keep its form. Pat inside dry.
2. Combine cream cheese, sugar, and vanilla in a large bowl. Beat together until well combined and fluffy.
3. Using your preferred tip, fill cheesecake filling into a pastry bag. Place tip inside in the strawberry and fill.
4. Place one blueberry on the top of the cheesecake filled strawberry to have all the wonderful colors of the 4th of July! You can leave out the blueberry and enjoy it plain. You can also add any topping you love, crushed nilla wafers, crushed graham crackers, crushed toasted almonds or other nuts, crushed Oreos, or anything else you like!
Anna's Pasta alla Pesto Trapanese and Met Lidia
Last week, I took my Mom to meet her absolute favorite Chef, Lidia Matticchio Bastianich. My mother has watched her PBS cooking show for years and fell in love with her recipes because they were the similar to the ones our family made. We have visited her restaurant in NYC, Becco. She did a cooking demonstration in Tom's River, NJ. It was a great time. There were many foods and wines to sample from local restaurants. After the demonstration, Lidia signed her newest book, Lidia Cooks from the Heart of Italy. My Mom was so excited to meet her. She cooked a few recipes from her new cookbook, but this one she demonstrated from an older book, Lidia's Italy, is my favorite so I made it when I got home!
Anna's Pasta alla Pesto Trapanese (Taken from Lidia's Italy)
3 cups of cherry tomatoes
12 large fresh basil leaves
3-4 whole garlic cloves
1/4 tsp pepperoncino
1 tsp sea salt
1/2 cup extra virgin olive oil
1 pound pasta of your choice
1/2 cup Pecorino Romano
pignoli nuts and shredded basil for garnish
1. Rinse cherry tomatoes and basil leaves. Pat dry. Cut the tomatoes in half.
2. In a blender or food processor, start off with tomatoes and basil, then the garlic, pepperoncino and salt. Blend for a minute or so until well pureed.
3. Pour in the olive oil in a slow steady stream with blending to emulsify the puree into a pesto. Taste and adjust to taste. Put in a large warm bowl.
4. Boil water and salt. Add pasta of choice and cook until al dente. Drain. Add pasta to pesto. Toss and sprinkle with cheese and basil. Toss again and serve!