Friday, December 31, 2010

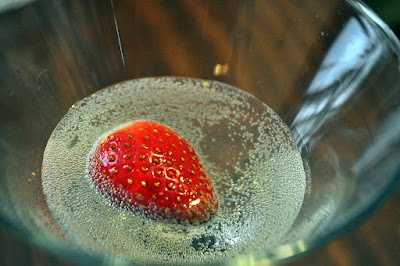
Poppin' Strawberry Bellini


A dynamite way to ring in the New Year with this drink in hand! My husband loves Pop Rocks, so he was trying to decide how to incorporate them into a New Year's food and here's what we came up with. Happy New Year!


1 part strawberry vodka
1 part strawberry daiquiri mix
2 parts prosecco or champagne
fresh strawberries
a few pkgs of strawberry Pop Rocks


1. Start with your strawberry in the glass (martini or champagne flutes work well)


2. Add prosecco first.


3. Pour in the vodka.

4. Slowly drizzle in the daiquiri mix.


5. Now here's the fun part! Sprinkle in about half a pack of Pop Rocks and watch them fizzle!

6. Your drink will continue you popping in your mouth for the next 10 or 20 minuets so enjoy while watching the fireworks! The strawberry itself even pops towards the end!


Thursday, December 30, 2010

Top 10 in 2010

2010 is already over?! I can't believe how fast it felt. With this year coming to a close, I like to look back on all that has already past. My hubby and I are on our second year of being happily married (almost 2 full years!), two best friends of mine married their sweethearts, one of very best friends had a beautiful baby girl, many fun nights with my family, holidays together, and lots of fun. All these wonderful events, remind me of something that happened in the kitchen, because that is where much living happens and hope that next year will bring even more wonderful events! Here's to a blessed year filled with much joy! Thank you to all those who have read my ramblings and recipes! A very Happy and Healthy New Year in 2011!


Here are my Top Ten Posts in 2010 :

10. Red, White, and Blue Berries


9. Pizzagaina


8. Baby Shower Onesie Cookies


7. Mamma's Meatballs


6. Cheerleader Cookie Favors


5. Anna's Pasta alla Pesto Trapanese


4. Colorful Swirl Cookies


3. Banana Raisin Bread


2. Bracciole


1. Fig Newtons


Also featured on:
http://www.designsbygollum.blogspot.com/


Wednesday, December 29, 2010

Stuffed Overnight Panetonne Toast for Breakfast


.....Or Dessert!

Panetonne is a traditional Italian bread usually eaten around Christmas and New Year, similar to a brioche bread with raisins. This breakfast can be prepared the night before and then baked in the morning. All the flavors will blend together over night resulting in a spectacular breakfast(or dessert)! It's a great way to use those Panetonne loaves hanging around after Christmas and it's an easy, but special breakfast great for this week between Christmas and New Year since many children and adults are off from work! Maximize your ability to sleep in!


I got this idea from a local diner that makes Stuffed French Toast, so I thought maybe switch the bread and a different process and came up with what I named Ovenight Stuffed Italian Panetonne Bread Pudding/French Toast Breakfast...but that name is unneccessarily long..so I shortened it.


1 stick butter, melted
3/4 cup brown sugar
2 tbsp corn syrup
1 loaf Panetonne bread
1 pkg (8oz) cream cheese, cubed
6 eggs
1 cup heavy cream
2/3 cup whole milk
1/4 cup sugar
1/3 tsp salt
1 tsp vanilla
2 tbsp Bailey's Caramel Liquor
1 tsp cinnamon


1. Stir melted butter, brown sugar, and corn syrup together to make a caramel mixture.

2. Pour half of the caramel mixture over the bottom of 9x 13 baking pan. Set aside the other half of the caramel mixture until later (the next morning).

3. Peel the paper off your loaf of Panetonne. Slice the loaf into thick slices. Trim the crust of the bread off.


4. Layer half the slices on top of the caramel mix to cover the bottom of the baking pan.


5. Spread out the cubes of cream cheese on top of the bread layer. For an even sweeter treat, you could add in some mascarpone cheese to this too! I had every intention to do so, but never got to the Shoprite in time!


6. Finish the top layer with another layer of bread slices to make a cream cheese stuffed sandwich.


7. Now to make the custard. Start by whisking the eggs. Add in the heavy cream, milk, sugar, vanilla, salt, and Bailey's, stirring after each addition.


8. Pour the custard evenly covering all the bread in the pan. Cover with foil and refrigerate overnight (refrigerate caramel mixture too). You will need to heat it for a few seconds in the morning.


8. Preheat oven to 350. If you are using a glass pan, be sure to take the pan out of the fridge while the oven is preheating so that the pan doesn't crack due to the switch from extreme cold to extreme hot. Remove cover and pour leftover warmed caramel mixture over the top. Bake for 40-45 minutes. When finished, remove from oven and serve warm.


Also featured on :
http://www.designsbygollum.blogspot.com/

Monday, December 27, 2010

Peanut Cashew Candy Cups


Today I woke up to a winter wonderland outside the window. The beautiful, pristine snow blanketed the ground and trees under a bright, sunny sky. Today is the perfect post-Christmas day to spend home, in the kitchen. It's time to make some candy today!


This candy is made, oddly enough, in a crockpot! I received my first crockpot after I got engaged to my hubby a few years ago, from one of my best friends. She is a crockpot genius, and I had little, if any experience using one before. I still have a long way to go, but I'm getting better at the mastery of crockpot cooking! So turn on your crockpot and get ready for a batch of sweet and salty candy cups!


9 oz semisweet chocolate baking squares
3 oz unsweetened chocolate baking squares
1 lb and 8 oz vanilla almond bark
10 oz milk chocolate
1 tsp vanilla extract
16 oz dry roasted peanuts
9 oz salted cashew pieces


1. Turn the crockpot on low and put all the chocolate in and cover.

2. After one hour, uncover and stir well. Return the lid and let sit for 20 minutes.

3. Then remove lid and stir. This time add the peanuts and cashews. Return the lid and let cook for another 20 minutes. Remove lid and stir.

4. Using a small cookie scoop, fill mini cupcake liners with the warm chocolate mixture. Then wait about half an hour to let the chocolate fully set up.

Sunday, December 26, 2010

Colorful Swirl Cookies


Merry Christmas! Hope everyone had a blessed Christmas and is relaxing after a wonderful holiday! I know I am!


If there is any holiday I truly love, it is Christmas. I love the snow, wrapping, baking, and all the decorations. There is a joy that can be felt in the air. Baking for the holidays has always been a favorite Christmas activity. My family has some holiday traditions such as the Feast of Seven Fishes, and My Grandma's Cookies that are must haves. But I like to try something new each holiday just for fun. And this year it was homemade caramels and these swirly sugar cookies.


These are sweet sugar cookies which are surprisingly easy since they are a slice and bake cookie. Yes, aside from making the dough and rolling it together, this is just as easy as going to Shoprite for some Pilsbury's sugar cookie dough, but it's so much better! These Christmas cookies were simple to make and eat!


2 cups flour, plus possibly a few more tbsp (the original recipe called for cake flour, but I just used regular old all-purpose flour since I was all out of a softasilk)
1/2 tsp baking powder
1/4 tsp salt
2/3 cup unsifted powdered sugar
1/4 cup granulated sugar
2 1/2 sticks unsalted butter (cut in chunks)
1 tsp vanilla
1/2 tsp of food coloring of your choice(and/or 1/2 tsp of any desired extra extracts)
1 1/2 cup holiday sprinkles


1. In a stand mixer, combine flour, baking powder, salt, and sugars with paddle on medium until well blended.

2. Add butter in, gradually, and continue mixing. Add in vanilla extract. At this point, your dough will form a ball on your paddle.

3. Remove all your dough and divide into two equal parts. Return one portion back in to the mixer and add the food coloring and any extra extracts. I used Wilton gel food coloring in leaf green and vanilla extract for this batch. You could coordinate your colors and flavors, for example green food coloring matched with a mint extract or yellow with a lemon extract, etc. Also, if you are using liquid food coloring, you will need to add a few tbsp of flour to keep the dough from becoming too wet. Mix until the color is spread out evenly.

4. Roll out each portions of your dough, between two sheets a wax paper until is reaches about 11 x 9 inches and is 1/4 inch thick. Slide both unto a cookie sheet and chill in the refrigerator for at least 2 hours.

5. When firm, remove the top sheets of wax paper from both. Brush the uncolored vanilla dough lightly with water using a pastry brush. Then flip the colored dough onto the vanilla uncolored dough so they are stacked atop each other and even. Press the edges lightly with your fingertips to seal them together. Using a small pairing knife, trim the edges of the dough to make straight, even lines.

6. Pour out sprinkles onto a large platter and set aside. Be sure your dough is still cold, but flexible. Once it's ready, begin rolling the long side of dough into a swirl, jelly-roll style. Now, don't get nervous if the outer layer of uncolored dough tears a bit. It's no problem, just pinch and pat those tears and voila, then just keep rolling.


7. Now gently lift your dough log onto the sprinkles and roll away. Cover the log completely with your sprinkles. Wrap the colorfully decorated log in plastic wrap twice. Depending on when you want to bake the cookies, either place the wrapped dough into refrigerator for about 3-4 hours or you can put it the freezer and keep it there for up to 2 months. (If freezing, give yourself time for the dough to defrost in the fridge overnight before cutting.)


8. Slice your dough into 1/4-1/8 inch slices and bake on parchment lined baking sheets. Bake at 350 for 15-17 minutes until edges are slightly golden. Let the cookies rest on the baking sheet for about 5 minutes, then move them to a cookie rack to finish cooling. Enjoy your whimsical Christmas cookies!


This is my entry for the December's What's Baking Challenge: A Holiday/Christmas Colored Baked Good. It has the colors of Christmas and is simple enough to make despite the busy holday season!

Adapted from Sprinkle Bakes.