Showing posts with label Holiday Food. Show all posts

Wednesday, April 2, 2014

Carrot Veggie Platter for Easter


If you are looking for simple and cute appetizer for Easter, then look no further! This is as easy as it gets, yet looks super adorable! Try it and I guarantee it will be a hit! You could pair this appetizer with an Easter bunny bread filled with dip. Then you have a bunny and his carrot. Also, you can eat the veggies from the carrot with the dip. Happy Easter!

3-4 carrots, peeled and sliced
2 heads of broccoli florets

1. Arrange slices of carrots in a narrow triangle shape.

2. Add broccoli florets in a heaping pile at top of the carrot triangle to make the carrot!

That's it! Like I said. Easy. Cute. Perfect.


Monday, March 31, 2014

Easter Bunny Veggie and Dip Platter


Anyone who knows me well knows I LOVE Pinterest!! It's basically my favorite internet pastime. It has something for everyone. Even my husband, who loathes Facebook and the like, enjoys the humor boards and DIY building stuff pins. Well, I saw this on Pinterest last year and thought it was just the cutest Easter themed food and I had to make it. If you are looking for a cute addition to your Easter table, try out this Easter bunny bread filled with Spinach Artichoke dip and surrounded by cut veggies. You can use the veggies or the bread for dipping. Both taste great! Happy Easter!


1 loaf round boule style bread
1 loaf italian or french baguette style bread
assorted veggies (I used baby carrots and red/yellow cherry tomatoes)
black olives and celery, for garnish

1. Cut off the top circle of the round loaf carefully to make the bunny's face. Hollow out the body by  ripping pieces from the inside of the round loaf to set aside for dipping, as well as, make room for the dip.

2. Cut the ends of the baguette off for the bunny's ears and place on tray above the round bread/bunny's head. Rip/slice the leftover middle section of the baguette and add to other bread pieces for dipping.

3. Slice an olive in half for bunny's eyes and quarter an olive for a piece to use as the center of the nose. Thinly slice a small piece of celery for the whiskers. Arrange bunny's face on the round top piece of bread.

4. Fill the bunny's body with dip and fill on the empty areas on the platter with veggies and bread pieces. 


Adapted from : The Nesting Corral

Tuesday, February 25, 2014

5 years and counting, Love sugar cookies

My husband, my best friend, my always helping and fun partner, my favorite person has dealt with me for five fun years of marriage.

 Yep, five years since we said I Do. It's a long time. We have laughed and cried together. And I'm so blessed to go through life with him. He's just the coolest guy in every way.

My husband is "that guy". That guy who holds open doors and cares for everyone. That guy who likes spending time with me as much as possible. He's that guy who cares for my friends and family like they are his own. He's that guy who always wants to help the world and will lend a helping hand to anyone. He's that guy who's can build a wall or fix or a door, but will also helps with fill piping bags and ice cookies (and he's good at both!). He's the guy who reads devotions to me at night even though he's tired and always thinks of my needs above his own. He's that guy who works hard and loves his job and his students.

So yeah, he's pretty awesome.
And I'm pretty lucky.

Here's to many more years together! Happy 5th anniversary Robert!


Our church had it's Valentine's banquet on our five year anniversary and I was making some desserts. So wisely, I made a few extras for us to celebrate with. It was pure genius to get married right after Valentine's day and not at all because it was when we had off for president's day...

 
These sugar cookies were fun to make. And rather simple. Make sugar cookie dough. Roll and cut. Bake. Make icing. Edge and flood. Dot and pull with toothpick. The end.

It may seem like many steps, but it really isn't bad.


I have been experimenting with a many bakers, bloggers, and other talented individuals' sugar cookie recipes and I have found my favorite. At least for now. The very talented Bridget, from Bake at 350, has a fantastic recipe which I will be sharing with detailed photos soon. Go check out her blog. It's amazing!

And for some royal icing tips and trick, Sugarbelle has opened my eyes to whole new world. Many helpful tricks for decorating with royal icing. My favorite part... NOT SIFTING! I have been sifting sugar like an idiot all this time and guess what?  It made no difference. Perfect Royal Icing without sifting. Thank you Sugarbelle!


Happy belated Valentine's Day and remember to appreciate those in your life worthy of love!


Sunday, December 15, 2013

Christmas Peanut Butter Sandwich Cookies on Jersey Bites


Check out this Christmas Peanut Butter Sandwich Cookies I shared over on Jersey Bites. They are peanut butter cookies with a peanut butter buttercream squished in the middle! I used a cookie press insert and sugar crystals to make the design on the cookies. Hope you enjoy these and have a Merry Christmas!!!!

Wednesday, December 11, 2013

Spiced Brown Sugar Cookies- The Great Food Blogger Cookie Swap 2013


The Great Food Blogger Cookie Swap 2013I recently participated in my first ever food blogger cookie swap. I found it from other bloggers who had participated in past years and was thrilled to be a part of this fun event! So basically, everyone makes a huge batch of a favorite cookie recipe to total 3 dozen cookies. These cookies get divided into three packages of one dozen cookies each and then sent to three different people. Therefore each participant gets to receive three packages of cookies from other bloggers! Isn't that a great Christmas treat to surprise you on your doorstep?

I had the joy of getting cookies from three lovely, talented bakers all across the US (literally... Florida, Texas, and Cali) and each one was unique and delicious! Here's a quick peek at what I got in the mail this past week....

First cookie delivery- A medley of Christmas cookies from Laurie at Food is Love. I had the pleasure of enjoying red and green velvet cookies, banana split cookies, and caramel brownie cookies. It was such a nice surprise after a long day to come to these on my doorstep!


Second cookie delivery- Delicious Rugelach from Emily at Totes Delishy. These were my mom's favorite! She tasted them and tried to steal them all! These were waiting for me in the morning so I decided they could count as a special breakfast treat!


Third cookie delivery-  Peanut Butter Cup cookies from Diana at Life Tastes So Good. Peanut butter cups are one of my all time favorite foods so needless to say, I was a big fan of these cookies! They made for a perfect snow day snack!


Now finally onto the cookies I shared for the Great Food Blogger Cookie Swap! I made these spiced brown sugar cookies which were similar to a snickerdoodle mixed with a cinnamon-gingersnap cookie. And they were so good! 


3 cups flour
2 tsp baking powder
1/2 tsp salt
1 tsp cinnamon
1/4 tsp pumpkin pie spice
1/2 cup sugar
1/2 cup brown sugar
2 sticks butter, softened
1 egg
2 tsp vanilla
Green and red sugar crystals


1. Beat butter and sugar on medium speed until light and fluffy. Add in egg and vanilla and continue to beat. 

2. Mix flour, baking powder, cinnamon, pumpkin pie spice, and salt in a separate bowl.  Slowly add dry mix while beating on low.

3. Wrap ball of dough in plastic wrap and refrigerate for 15 minutes. Take out of fridge and roll into balls then flatten with your hand. These cookies retain their shape well.

4. Place on parchment lined sheet and sprinkle with red and green sugar crystals. Bake on 350 degrees for 10 minutes. Allow a few minutes to set on baking sheet and them remove to cool.


Adapted from : Annie's Eats

Wednesday, March 6, 2013

Easter Bunny Cake

 
Easter is coming quickly and soon you will be planning a menu for the holiday. For a fun Easter dessert, try this Easter Bunny cake. You can make the cake from scratch or from a mix depending on your preference.

For cake:
1 batch of vanilla dry cake mix
3/4 cup water
2 tsp vanilla
1/2 cup softened butter
3 eggs

For icing and decorating:
12 oz cream cheese
1 1/2 cups butter
1 1/2 tsp vanilla
10 oz coconut
jelly beans
green food coloring


1.In a large mixing bowl, take your cake mix and add in 3/4 cup water, 2 tsp vanilla, 1/2 cup softened butter, and 3 eggs.

2. Combine well and pour into two 8" round cake pans with parchment. *You only need one 8" cake, but the recipe makes two, so you will have an extra round cake.* Bake on 350 degrees until toothpick comes out clean, for about 20-25 mins.

3.While the cake is baking, make frosting by beating the butter, cream cheese, and vanilla together. Add in sugar and continue beating until light and fluffy. Set aside in refrigerator.

4. Let cake cool and then remove from pans. Take one of the round cakes and cut in the half. Then stand them up vertically, side by side, so it is shaped like a half circle.

5. Using a sharp knife, cut and remove a small "v-shaped" section of cake to form two humps (head/body). Take the piece of removed cake and round it. Place at the back for a tail.

6. Take a portion of coconut and mix with a few drops of green food coloring for the grass.

7. Frost entire cake and gently press white coconut all around cake and sprinkle green colored coconut around the cake, on the base. Press two black jelly beans into the face for eyes and an orange one for a nose. Toss a few jelly beans around the cake in the green coconut grass.

8. I made ears from a plain piece of paper cut into bunny ear shape and covered the bottoms in foil. Insert paper ears behind the head. (I believe I made the ears a bit too big, so next time I'll try for a little smaller.)

Monday, March 4, 2013

Easter Peeps Cupcakes

 
Even though it feels as if Christmas and Valentine's Day just ended, before we know it St. Paddy's day and Easter will be here! So today, I'm sharing these cupcakes I made for Easter. My hubby is obsessed with peeps, and so is my grandpa, despite the fact he shouldn't have them. These were super simple and cute for a last minute Easter dessert. I used this homemade cake mix recipe and this cream cheese frosting recipe.

One batch of vanilla dry cake mix (you can use store bought cake mix or icing and follow the instructions on box or make your own and follow these directions)
For cupcake mix:
3/4 cup water
2 tsp vanilla
1/2 cup softened butter
3 eggs

For icing and decorating:
12 oz cream cheese
1 1/2 cups butter
1 1/2 tsp vanilla
3 cup confectioner's sugar
sprinkles
peeps marshmallow candy chicks or bunnies


1. In a large mixing bowl, take your dry cake mix and add in 3/4 cup water, 2 tsp vanilla, 1/2 cup softened butter, and 3 eggs.

2. Combine well and bake on 350 degrees until toothpick comes out clean (about 12-15 mins).

3. Now for the frosting, start by beating the butter, cream cheese, and vanilla together. Add the sugar and continue beating until light and fluffy.

4. Frost cupcakes with large dollops of icing and smooth out the top. Then roll the edges in sprinkles, leaving the smooth top sprinkle free. Stick a peep of your choosing on the flat top.

Friday, March 1, 2013

Happy Birthay Dr. Seuss!

Just a quick shout out to one of my life long obsessions and childhood authors, Dr. Seuss! Happy Birthday! And yes, both my husband and myself donned red and white striped hats, all black clothing, white gloves, bow ties, and eyelinered faces to school today to be the Cat in the Hat. The kids loved it! After reading many good books with all the students and eating green eggs and ham, I'm ready for the weekend! Have a lovely weekend all!

Tuesday, June 28, 2011

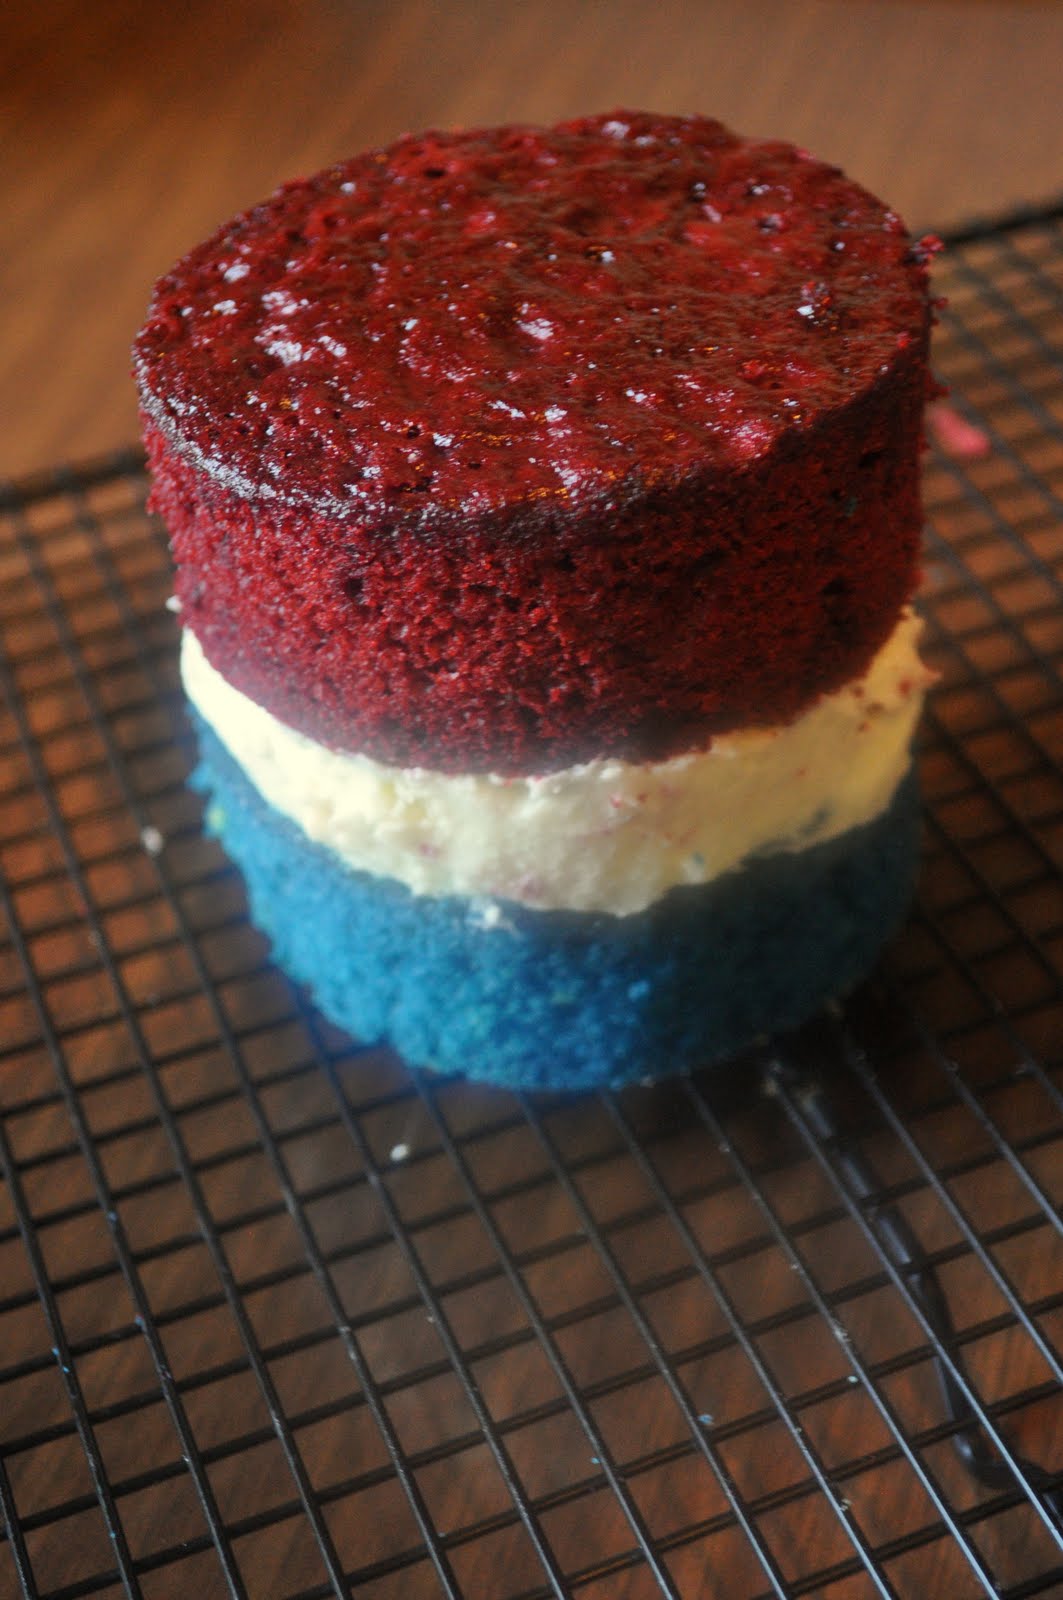
Red, White, and Blue Mini Layer Cakes for Two


This month's What's Baking challenge, from Heather of Hezzi-D's Books and Cooks, was to bake a layer cake. And I love layer cakes! You get more icing and filling than other cakes! Why not have layers? The logic seems to work, at least for me.


Since the 4th of July is coming up just around the bend, I decided to make my layer cake patriotic with red, white, and blue components. Red was simple, because I love red velvet, blue was just a spin-off of red velvet now called blue velvet, and since hubby had just taken a trip to Junior's recently and brought me some cheesecake, I had cheesecake on the brain. The assembly resembles our wedding cake as well! Our wedding cake was chocolate and vanilla layers with actual NY cheesecake in the middle covered with chocolate ganache. Well, this is similar, red and blue velvet cake with cheesecake piped in the middle covered with white chocolate ganache. And if you are thinking to yourself, "Which was better?", all I can say is... I'm not going to argue with either one!


Cheesecake:
1 1/2 lbs cream cheese
1 1/3 cups sugar
5 large eggs
16 ounces sour cream
1/4 cup flour
2 teaspoons vanilla extract
1 teaspoons lemon juice

Cake: (Red Velvet/Blue Velvet)

2 1/2 cup cake flour
1 1/2 cup sugar
1 tsp baking soda
1 tbsp cocoa powder
1 tsp salt
2 eggs, room temp
1 1/2 cup oil
1 cup buttermilk
1 tbsp gel food color, approx.
1 1/2 tsp vanilla
1 tsp white distilled vinegar

White Chocolate Ganache:
8 oz white chocolate
2/3 cup heavy cream

*Makes 3-4 mini layer cakes*


1. Let's start with making our cheesecake, since it has to cook and cool the longest. You may recognize this cheesecake recipe from an earlier post here. It's the same minus the crust.

2. Start by creaming the softened cream cheese. Then add the sugar and eggs, one at time, while continuing to beat on low.

3. Add flour, lemon juice, and vanilla. Stir. Fold in the sour cream.

4. Pour batter in a 9" springform pan and bake on 325 degrees for about an hour and fifteen minutes. No need to be worried about cracking or appearance for this cheesecake seeing as it be piped later. Once cooled, place in fridge until time to assemble cake.

5. Now, let's work on our cakes. We are going to make red and blue velvet cakes in 9" cake pans. To do so, we are going to simply divide the batter and add red food coloring to one half and blue food coloring to the other half. If you wanted to make a few more mini cakes, you could double the recipe and dye each batch, red and blue respectively. This recipe is from an earlier post of red velvet stuffed cupcakes.

6. In a medium bowl, sift together all of the dry ingredients for the cupcakes: flour, sugar, baking soda, cocoa, and salt. Set aside.

7. In the bowl of a stand mixer add all the wet ingredients: eggs, oil, buttermilk, food coloring, vanilla, and vinegar. Beat until smooth.

8. Slowly add the dry mix into the wet mix and blend for a minute or two until fully incorporated. Pour batter into two greased and floured cake pans.

9. Bake at 350 for 28-33 or until fully done. Test with toothpick. Set aside to cool.

10. Once both the cheesecake and cakes are fully cooled, you can begin to make the white chocolate ganache. Place the white chocolate, slightly broken up, into a double boiler over low heat.

11. Stir and let chocolate melt slowly. Add in the heavy cream and continue to stir over low heat. Once fully melted, continue to stir for about 2 minutes, then remove from heat and allow to cool for about 15 minutes, stirring occasionally while cooling.

12. Time to assemble! Start by using a cookie cutter or I used a biscuit cutter to make 3 " circles. Depending on the exact shape of the pan and cutter, you will yield either three or four of each color. Place the blue circles on a baking rack. Blue cakes will be bottoms and red cakes will be tops, but you can feel free to switch 'em up!

13. Scoop cheesecake into a piping bag fit with a coupler and large round tip. Begin piping on top of each blue cake circle to fill the surface. Continue with all bottoms. Place red circles on top of the cheesecake filling to finish the cake tower.


14. By now, the ganache should be fully cooled. Be sure to place a dish or cookie sheet under the baking rack to catch the drips. Start spooning white chocolate ganache over the cakes and let it drip down the sides.


15. Depending on the thickness you desire, you may want one or two coats of ganache. I did two on mine. After the first coat, pop them in the fridge for 10 minutes and then apply second coat!
That's it! Now you have a perfect patriotic dessert for the 4th of July! Enjoy!


Also featured on: Savory Sunday, Mangia Monday,Moutherwatering Monday, Made from Scratch Tuesday, Tempt my Tummy Tuesday, This Chick Cooks

Tuesday, March 22, 2011

Bailey's Irish Cream


In honor of St. Patrick's Day, I wanted to make something Irish, especially since hubby is Irish and loves, well, all things edible. These two ideas collided and out came, Bailey's Irish Cream. Irish cream is great as a drink, but also a great addition to baking and cooking. Plus, it contains two of the best flavors, chocolate and coffee. Who doesn't love that? It almost tricks you into thinking it's a dessert in itself!


1 tsp instant espresso granules
1 1/2 tbsp unsweetened cocoa powder
1/2 tsp cinnamon
1/4 tsp powdered sugar
3/4 cup heavy cream, divided
3/4 cup milk
1 (14 oz.) can sweetened condensed milk
1 Tbsp honey
1 1/2 cups Irish whiskey
1 1/2 tsp vanilla extract

1. In a small bowl, mix together the espresso, cocoa powder, cinnamon, powdered sugar, and 3 tbsp of heavy cream. Stir until dissolved and set aside.

2. Pour all the remaining ingredients into a large bowl including the cocoa espresso mixture.

3. Use an immersion blender to incorporate all ingredients together for 20-30 seconds until your mixture is smooth. If you do not have an immersion blender a traditional blender on pulse or puree will work as well.

4. Pour it into your favorite sealable containers. Let the drink sit overnight for all the flavors to blend together.

5. Be sure to give it a good shake before using and enjoy your homemade Irish cream for up to 2 months. Store in refrigerator.


Source: 6 Bittersweets


Also Featured: Tasty Tuesdays and Tempt my Tummy Tuesday

Saturday, February 26, 2011

Stuffed Red Velvet Cupcakes with Cream Cheese Frosting


These cupcakes were simply delightful! They were were a perfect flavor combo! For this month's What's Baking challenge, hosted by Dunne from With a Cherry on Top, we were asked to share something Baked with Love. February is one of my favorite months. Not only is it Valentine's Day, but it's also our anniversary! I first made these cupcakes for one of my best friends, Stephanie's birthday, last year and then again for our anniversary recently. I loved the recipe both times I made it and I'll be sure to find another excuse to make them in the future.


Cupcakes:
2 1/2 cup cake flour
1 1/2 cup sugar
1 tsp baking soda
1 tbsp cocoa powder
1 tsp salt
2 eggs, room temp
1 1/2 cup oil
1 cup buttermilk
1 tbsp gel food color, approx. (Wilton Red)
1 1/2 tsp vanilla
1 tsp white distilled vinegar

Filling:
10 oz cream cheese
3/4 cup sugar
1 1/2 tsp vanilla
1/4 tsp cinnamon
1 tsp lemon juice

Frosting:
12 oz cream cheese
12 oz butter
1 1/2 tsp vanilla
3 cup confectioner's sugar


(Makes about 2 dozen cupcakes)


1. In a medium bowl, sift together all of the dry ingredients for the cupcakes: flour, sugar, baking soda, cocoa, and salt. Set aside.

2. In the bowl of a stand mixer, beat eggs, oil, buttermilk, food coloring, vanilla, and vinegar until smooth.

3. Slowly add in the dry mix and blend for a minute or two until fully incorporated.

4. Fill cupcake pan with liners about 2/3 full. Bake on 350 for 20-22 minutes or until toothpick inserted into cupcake comes out clean. Remove from pans and let fully cool.

5. While the cupcakes are cooling, prepare your filling and frosting. In a mixing bowl, beat cream cheese, sugar, lemon juice, vanilla, and cinnamon just until well blended. Spoon filling into a pastry bag with no tip, just a coupler or a large round tip and set in refrigerator.

6. Now for the frosting, start by beating the butter, cream cheese, and vanilla together. Add the sugar and continue beating until light and fluffy. Fill another pastry bag with the frosting using any tip you desire to decorate your cupcakes; I used a Wilton star tip. Store in refrigerator until ready. Both the frosting and the filling can be made in advance to save time, just twist the tops of your pastry bags so they are closed.

8. Once the cupcakes are cooled, it's time to make a hole for the filling. Using a small paring knife, cut a cone shaped piece of cake from the top center of the cupcake. Be sure to cut only partially into the cupcake and not all the way down to the bottom. Discard the cones or eat them while you decorate.

9. Using your pastry bag with filling, begin to squeeze filling into each cupcake's cavity just until it reaches the top.

10. Take your other pastry bag full of frosting and begin to ice the cupcakes by making concentric circles starting on the outer edge and working your way inward and up. These cupcakes are best stored in the refrigerator until it's time for your event. Hope you enjoy your cupcakes!

Source: Apple a Day, another great foodie blog

Friday, February 25, 2011

Spinach Artichoke Dip


This dip is easy to make, but tastes like you slaved all day over it! It's become the new appetizer that is most requested at all events! Try it out for your next party or get-together! This dip is thick and creamy with flavors that combine so well and was another Superbowl favorite!


8 oz. cream cheese, softened
1/3 cup freshly grated Parmesan cheese, plus more for topping
1/3 cup Pecorino grated cheese
1/3 cup sour cream
1/3 cup mayonnaise
10 oz. frozen chopped spinach, thawed and drained
1 cup coarsely chopped canned artichoke hearts
4 cloves roasted garlic (See bottom of post)
¼ tsp. salt
½ tsp. roasted red pepper flakes


1. Combine all ingredients in a large bowl and mix well to incorporate.

2. Spread mixture in a small baking dish and sprinkle extra parmesan and pecorino on top.

3. Bake 35-40 minutes on 400 degrees.

4. Serve warm with sliced Italian bread, crackers or chips and enjoy!


How to Roast Garlic- Roasted garlic has mild flavor compared to raw, but still adds that great garlic taste!

1. Cut off the very tops of the garlic bulb, but leave the rest of the skins on. You can leave entire bulb in tack if you plan to roast the whole thing. If not, seperate the cloves you want. You can roast the whole bulb and save some of the roasted garlic for a later use.

2. Brush some olive oil on top of the garlic bulb and place it on a baking sheet covered in foil. Cover with more foil.

3. Bake for 40 minutes or so on 375 degrees. Remove from oven and let cool.

4. Remove the roasted garlic by separating the cloves and squeezing out the garlic. The garlic will be soft and pulpy.

5. You can either store these in a sealed container or smash it into a paste using a fork.

Source: Annie's Eat (one of my go-to websites for all things food)

Wisconsin Wings


What better for Superbowl celebration than wings that support your team! Go Greenbay! These wings were delicious with a crunchy coating and carried our love for the Packers! My father and brother are lifelong Packers fans and were so excited for this Superbowl! We decked the house in green and yellow everything. We even found my dad's Greenbay football helmet from high school! My hubby and brother made a "cheesehead hat" out of cardboard and paint while Mom and I coooked in the kitchen. If they wouldn't kill me, I'd post photos of them wearing it! It was a great game with lots of good food and these wings were a hit!

3/4 cup finely crushed cracker crumb (I used Ritz toppers)
1/3 cup grated parmesan cheese
1 tsp dried oregano leaves
1/2 tsp garlic powder
1/2 tsp paprika
1/8 tsp fresh coarse ground black pepper
2 lbs chicken wings, split and tips removed
1/3 cup Dijon mustard


1. Combine the cracker crumbs, cheese, oregano, garlic powder, paprika, and black pepper in a bowl.

2. Using a pastry brush, spread a coat of mustard of the chicken pieces and then roll in the crumb mixture until fully coated.

3. Lay chicken pieces on a greased baking sheet and on 350 for 35-40 minutes.

Source: http://www.food.com/recipe/wisconsin-wings-98192

Parmesan Garlic Wings


These wings are simple and mild, quite yummy, and made especially for those who don't like the hot, spicy kind (aka my mom). In college, my hubby (boyfriend at the time) and I discovered Buffalo Wild Wings. We fell in love with the wings and my favorite was by far their Parmesan Garlic Wings. We always bought a bottle of this sauce whenever we go. Even now when we take a roadtrip, we will gladly take a quick detour in exchange for a bottle of sauce to bring home. So for the Superbowl, I wanted to make a few different kinds of wings and these were a must have! I made the wings a little healthier by bake them instead of frying. I will say, it did not taste quite like the sauce we had become accustomed to, but it was still very good. I think it was lacking some seasoning and I'll try this recipe another time with some changes and see if I can get to closer to the actual BWW recipe.

2 lbs chicken wings and drumettes
1/2 cup butter, melted
1 teaspoon garlic powder
1/2 teaspoon onion salt
1/4 teaspoon black pepper, freshly ground
1/2 cup parmesan cheese, grated

1. You can use either fresh or frozen wings. Frozen wings are already prepped and separated, but if you are going to fresh route you will need to prep the chicken. First, chop off the wing tip using a sharp knife so it will not burn. Then separate the drumette and wing by cutting through the skin and joint with a knife.

2. Line a baking sheet with foil and grease it. Bake the wings on 400 for about 40-45 mins. Turn the wings over halfway through baking time. Broil the wings for just a minute or two after baking to crsip them up a bit and give them more of a "fried" texture.

3. Mix all other ingredients into a large sealable bowl. Once wings have cooled slightly, add them to the warm sauce, cover and shake until welly coated.

4. Pour on a platter and serve with the classic celery and ranch.

Source: http://www.epicportions.com/2009/02/25/buffalo-wild-wings-recipes/

Saturday, January 1, 2011

Monkey Bread

Follow my blog with bloglovin

Another great breakfast that is so fun and easy; Great for New Year's Morning! Monkey Bread is one of my husband's favorites. I mean, how it could it not be? Sugar and cinnamon caramelized in the oven is a great way to start the day, especially a day off of work!


2 large cans (16.3 ounces) refrigerated biscuits
1 cup (2 sticks) unsalted butter, melted
1 1/2 cups sugar
2 tablespoons cinnamon
1/2 cup pecan halves (I omitted the pecans)

1. Preheat the oven to 350. Grease a bundt pan or tube pan with non-stick spray.

2. In a small bowl, combine the sugar and cinnamon. Set aside.

3. Cut the biscuits into quarters. Dip each piece in butter, roll it in cinnamon sugar, and place it in the pan. Sprinkle pecans onto the biscuit pieces at random. Pour any remaining butter evenly over the biscuit pieces in the pan.

4. Bake for about 40 minutes or until the top springs back when touched. Cool in the pan on a wire rack for 10 minutes. Invert onto a plate, and serve immediately. I also made a cream cheese icing to have on the side for dipping!

Recipe taken from: Ezra Pound Cake

Friday, December 31, 2010

Poppin' Strawberry Bellini


A dynamite way to ring in the New Year with this drink in hand! My husband loves Pop Rocks, so he was trying to decide how to incorporate them into a New Year's food and here's what we came up with. Happy New Year!


1 part strawberry vodka
1 part strawberry daiquiri mix
2 parts prosecco or champagne
fresh strawberries
a few pkgs of strawberry Pop Rocks


1. Start with your strawberry in the glass (martini or champagne flutes work well)


2. Add prosecco first.


3. Pour in the vodka.

4. Slowly drizzle in the daiquiri mix.


5. Now here's the fun part! Sprinkle in about half a pack of Pop Rocks and watch them fizzle!

6. Your drink will continue you popping in your mouth for the next 10 or 20 minuets so enjoy while watching the fireworks! The strawberry itself even pops towards the end!


Sunday, December 26, 2010

Colorful Swirl Cookies


Merry Christmas! Hope everyone had a blessed Christmas and is relaxing after a wonderful holiday! I know I am!


If there is any holiday I truly love, it is Christmas. I love the snow, wrapping, baking, and all the decorations. There is a joy that can be felt in the air. Baking for the holidays has always been a favorite Christmas activity. My family has some holiday traditions such as the Feast of Seven Fishes, and My Grandma's Cookies that are must haves. But I like to try something new each holiday just for fun. And this year it was homemade caramels and these swirly sugar cookies.


These are sweet sugar cookies which are surprisingly easy since they are a slice and bake cookie. Yes, aside from making the dough and rolling it together, this is just as easy as going to Shoprite for some Pilsbury's sugar cookie dough, but it's so much better! These Christmas cookies were simple to make and eat!


2 cups flour, plus possibly a few more tbsp (the original recipe called for cake flour, but I just used regular old all-purpose flour since I was all out of a softasilk)
1/2 tsp baking powder
1/4 tsp salt
2/3 cup unsifted powdered sugar
1/4 cup granulated sugar
2 1/2 sticks unsalted butter (cut in chunks)
1 tsp vanilla
1/2 tsp of food coloring of your choice(and/or 1/2 tsp of any desired extra extracts)
1 1/2 cup holiday sprinkles


1. In a stand mixer, combine flour, baking powder, salt, and sugars with paddle on medium until well blended.

2. Add butter in, gradually, and continue mixing. Add in vanilla extract. At this point, your dough will form a ball on your paddle.

3. Remove all your dough and divide into two equal parts. Return one portion back in to the mixer and add the food coloring and any extra extracts. I used Wilton gel food coloring in leaf green and vanilla extract for this batch. You could coordinate your colors and flavors, for example green food coloring matched with a mint extract or yellow with a lemon extract, etc. Also, if you are using liquid food coloring, you will need to add a few tbsp of flour to keep the dough from becoming too wet. Mix until the color is spread out evenly.

4. Roll out each portions of your dough, between two sheets a wax paper until is reaches about 11 x 9 inches and is 1/4 inch thick. Slide both unto a cookie sheet and chill in the refrigerator for at least 2 hours.

5. When firm, remove the top sheets of wax paper from both. Brush the uncolored vanilla dough lightly with water using a pastry brush. Then flip the colored dough onto the vanilla uncolored dough so they are stacked atop each other and even. Press the edges lightly with your fingertips to seal them together. Using a small pairing knife, trim the edges of the dough to make straight, even lines.

6. Pour out sprinkles onto a large platter and set aside. Be sure your dough is still cold, but flexible. Once it's ready, begin rolling the long side of dough into a swirl, jelly-roll style. Now, don't get nervous if the outer layer of uncolored dough tears a bit. It's no problem, just pinch and pat those tears and voila, then just keep rolling.


7. Now gently lift your dough log onto the sprinkles and roll away. Cover the log completely with your sprinkles. Wrap the colorfully decorated log in plastic wrap twice. Depending on when you want to bake the cookies, either place the wrapped dough into refrigerator for about 3-4 hours or you can put it the freezer and keep it there for up to 2 months. (If freezing, give yourself time for the dough to defrost in the fridge overnight before cutting.)


8. Slice your dough into 1/4-1/8 inch slices and bake on parchment lined baking sheets. Bake at 350 for 15-17 minutes until edges are slightly golden. Let the cookies rest on the baking sheet for about 5 minutes, then move them to a cookie rack to finish cooling. Enjoy your whimsical Christmas cookies!


This is my entry for the December's What's Baking Challenge: A Holiday/Christmas Colored Baked Good. It has the colors of Christmas and is simple enough to make despite the busy holday season!

Adapted from Sprinkle Bakes.