Showing posts with label Sweet Sauce. Show all posts

Monday, October 28, 2013

Rum Raisin Cinnamon Scones


For the month of October, we were challenged to make scones by Jaida from Sweet Beginnings! I'm a big fan of starbucks cinnamon chip scones so I immediately decided to try to make something like that and they turned out fantastic.  However my husband requested scones with raisins so I combined two recipes to make one awesome scone, rum raisin cinnamon scone! And it turned out delicious!!

Scones:

2 cups flour
3 tbsp brown sugar
2tbsp white sugar
1 tbsp cinnamon
3 tsp baking powder
1/2 tsp salt
1/2 cup butter, cold
2/3 cup whole milk
2 tsp vanilla extract
2 tsp rum
1 egg
1/2 cup raisins

Filling:

1/4 cup brown sugar
1 tsp cinnamon
1 tsp heavy cream, and some more for brushing

Icing:

1 cup powdered sugar
1 tbsp heavy cream
1/2 tsp cinnamon
1 tsp vanilla
1 tsp corn syrup


1. Mix all dry ingredients for scones together in a large bowl.  Cut in cold butter using a pastry cutter or two forks until the mixture resembles course crumbs.

2. Add in extracts, milk, egg, and rum. Mix well. Gently fold in raisins. Pour mixture onto a large piece of wax paper to form a rectangle (about 5 by 10 inches).

3. Mix brown sugar, cinnamon, and heavy cream in a small bowl for filling. Spread across the top of half the scone dough.

4. Using the wax paper, fold the dough in half by putting the dry scone dough over the side with filling. Press dough down sealing in the filling and stretching the dough out into a large 12 by 6 inches rectangle.

5. Using a sharp knife dipped in flour, cut the rectangle into 8 squares and then cut each square diagonally to make 16 triangle scones.

6. Place on parchment lined baking sheet and brush with cream. Bake on 400 degrees for 13-16 mins.

7. While scones cool, make icing by combining all ingredients in a bowl. Drizzle icing over scones and let it set.

Sources: Adapted from Stella B's Kitchen and Created by Diane


Thursday, July 28, 2011

Nectarine and Blueberry Scones with a Honey Butter Glaze


This month of new home demolition is crazy as ever, but we are beginning to see the progress, which is so encouraging! I'm so very excited to finally move in! Hopefully it will be next month! For now, we are busy bees getting everything ready that we can. And the best part, we are finally free of those scorching hot days!


This month's What's Baking Challenge was to Bake Local, hosted by Lindsey of Our Share of the Harvest. I'm a big fan of using local foods and supporting local businesses so this was right up my alley! I stopped by two farmer's markets and a roadside stand to get my booty for this fun recipe.
My favorite farmer's market purchase was definitely the raw fall honey. It's so different than the honey you buy at a store and it's healthier for you too! I also scored some yummy nectarines and blueberries.


I have a little funny story related here. I was planning to make a stone fruit crostata with my local bought produce for this month's challenge. I started making my normal go-to Lidia Matticchio Bastianich's recipe and, much to my dismay, the dough was not forming at all! It never harden, just stayed liquid. Yuck! I ended up throwing it away. My confidence was starting to get shaken, but I figured I have to try again anyway. So I went for attempt #2, which started out better, but the end product was still lacking. I couldn't figure it out. Why was my dough behaving so funny? The humidity in the kitchen? My ingredients were not chilled enough? Should I have used a different utensil to mix? I was truly baffled by these events!
So I let the dough chill in the fridge overnight, as per the directions. In the morning, it was none the better. I was unable to roll it out, only press it into a disc with my palms to flatten. But I had to try to bake it at this point just to see what would happen. So I threw together my fruit filling and laid in on top and rolled it all up. Finally, it looked pretty good, despite my earlier issues. I popped it in to bake hoping it would turn out well. I left the kitchen for barely a minute or two, then came back to check on it to find.... that the dough had melted! Yes, that's right, melted! Literally. It ran down the parchment, over the pan, off the sides and onto the oven floor where it had already puddled. The best part? The puddle was on FIRE! Needless to say, I was done baking that day... Well, the end of my story is that I cleaned it up and decided to make scones. I am using my mother's kitchen since we are in the middle of moving, and discovered that when I thought I was using flour, the whole time I was using confectioner's sugar!!! My mom keeps them in these large upright Tupperware containers. And I know the spot the flour lives, but apparently she switched up their order in the closet. I can't believe I didn't notice it earlier, but at least I found out why! I guess we need to purchase some labels for our containers... Thanks for listening to my crazy story and now if you are still reading this enjoy these scones! They are so sweet and full of fresh fruit; hmmm... breakfast or dessert?


3/4 cup diced nectarines, peel on
3/4 cup blueberries
4 cups all-purpose flour
2/3 cup powdered sugar
1/2 cup granulated sugar
2 tablespoons baking powder
1 teaspoon nutmeg, divided
2 teaspoons cinnamon
1 teaspoon salt
2 cup cold heavy cream, plus additional for brushing
1/3 cup honey
1/4 butter


1. Mix all the wet ingredients together in the bowl of a stand mixer.

2. In a separate bowl, whisk together all the dry ingredients.

3. Slowly add the flour into the wet mixture, stirring periodically. This dough will be quite stiff.

4. Turn the dough onto a well floured surface and knead with floured hands for a minute a two.

5. Flatten your dough slightly and press all your frozen fruits into the dough. Continue to knead for another minute or two to spread the fruit evenly through your dough.

6. Using your hands, shape the dough into a large, flattened circle. Using a floured knife cut the dough in half to form two half moons. Then cut each each half moon in thirds resulting in a total of six wedge shaped scones.

7. Now you can either place a few on a parchment lined baking sheet or you can freeze them for later use. To freeze, simply place scones on a baking sheet in freezer just long enough to harden, then transfer into freezer bags. Defrost and brush with cream when you are ready to bake them at a later date. To bake, brush them with a few tablespoons of heavy cream and place them in a 425 degree oven for about 24-26 minutes.

8. While the scones are baking away in the oven, put the honey and butter in a glass measuring cup in the microwave for 90 seconds (a minute and a half) on high, stirring once halfway through.

9. When scones are cooling, brush them with honey butter and let sit for 20 minutes then brush them again. This helps them to stay fresh for up to 4 days. It's a natural (and very sweet) replacement for preservatives!


Enjoy!


Source: Adapted from 5 Second Rule and Baking and Books

Also featured on: Made From Scratch Tuesday, Works for me Wednesday, Full Plate Thursday, Foodie Friday, Ultimate Recipe Swap

Tuesday, June 28, 2011

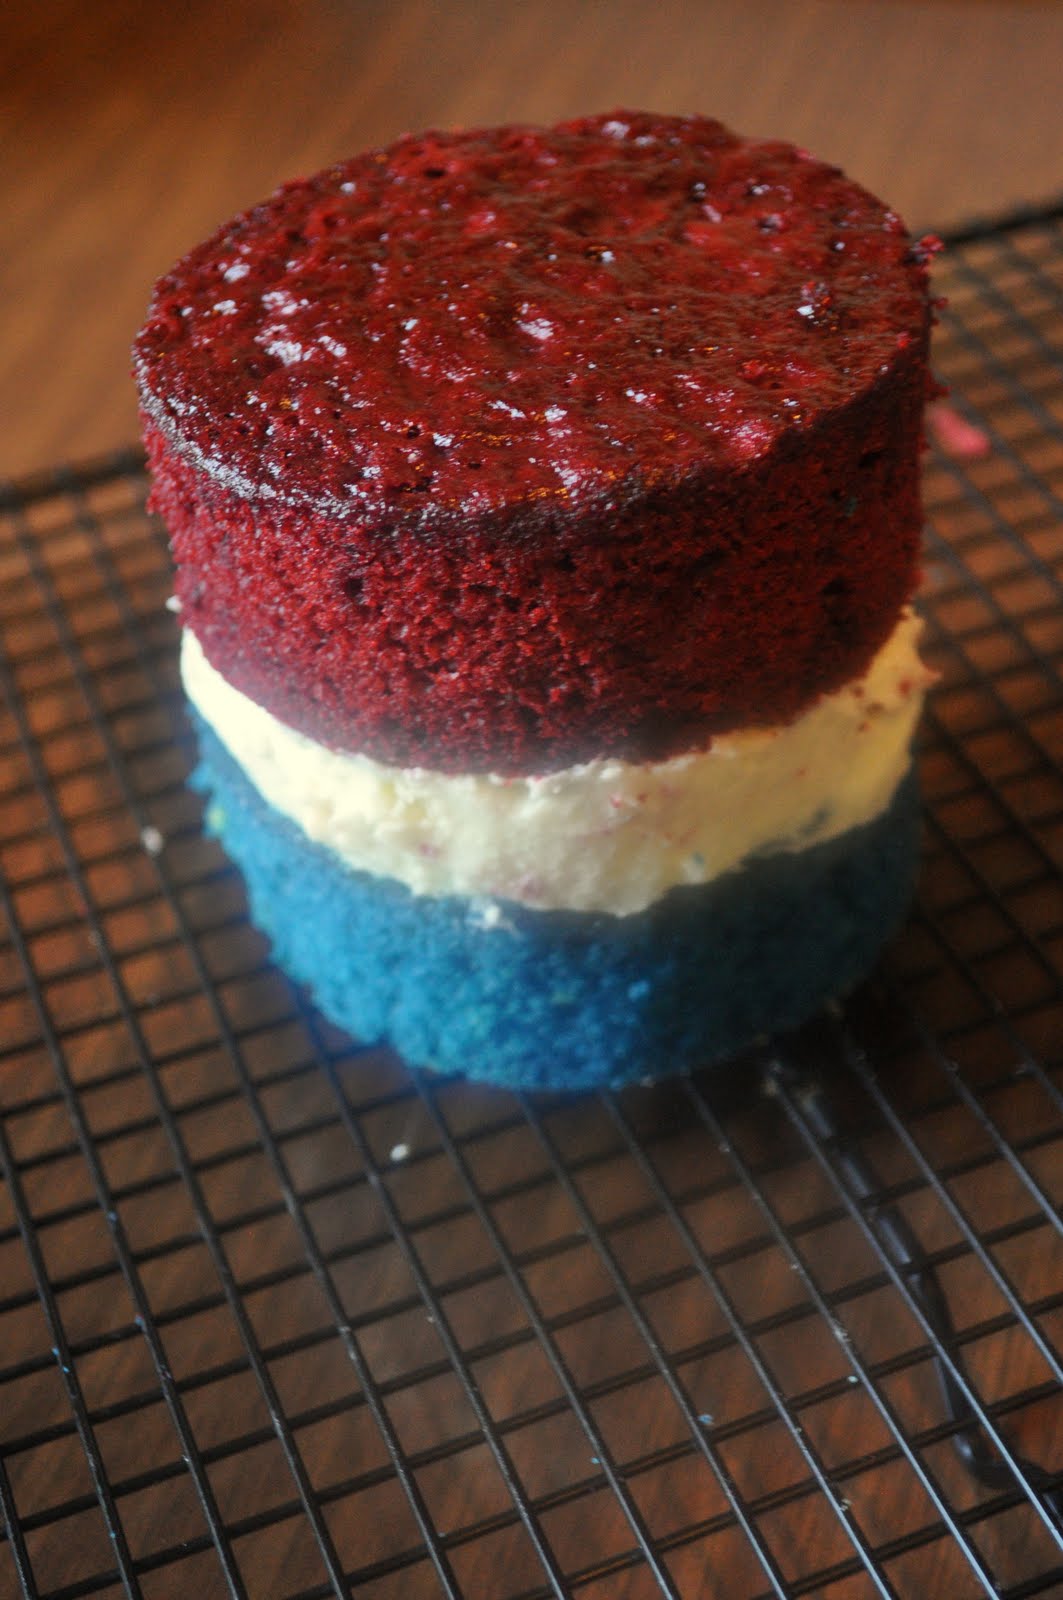
Red, White, and Blue Mini Layer Cakes for Two


This month's What's Baking challenge, from Heather of Hezzi-D's Books and Cooks, was to bake a layer cake. And I love layer cakes! You get more icing and filling than other cakes! Why not have layers? The logic seems to work, at least for me.


Since the 4th of July is coming up just around the bend, I decided to make my layer cake patriotic with red, white, and blue components. Red was simple, because I love red velvet, blue was just a spin-off of red velvet now called blue velvet, and since hubby had just taken a trip to Junior's recently and brought me some cheesecake, I had cheesecake on the brain. The assembly resembles our wedding cake as well! Our wedding cake was chocolate and vanilla layers with actual NY cheesecake in the middle covered with chocolate ganache. Well, this is similar, red and blue velvet cake with cheesecake piped in the middle covered with white chocolate ganache. And if you are thinking to yourself, "Which was better?", all I can say is... I'm not going to argue with either one!


Cheesecake:
1 1/2 lbs cream cheese
1 1/3 cups sugar
5 large eggs
16 ounces sour cream
1/4 cup flour
2 teaspoons vanilla extract
1 teaspoons lemon juice

Cake: (Red Velvet/Blue Velvet)

2 1/2 cup cake flour
1 1/2 cup sugar
1 tsp baking soda
1 tbsp cocoa powder
1 tsp salt
2 eggs, room temp
1 1/2 cup oil
1 cup buttermilk
1 tbsp gel food color, approx.
1 1/2 tsp vanilla
1 tsp white distilled vinegar

White Chocolate Ganache:
8 oz white chocolate
2/3 cup heavy cream

*Makes 3-4 mini layer cakes*


1. Let's start with making our cheesecake, since it has to cook and cool the longest. You may recognize this cheesecake recipe from an earlier post here. It's the same minus the crust.

2. Start by creaming the softened cream cheese. Then add the sugar and eggs, one at time, while continuing to beat on low.

3. Add flour, lemon juice, and vanilla. Stir. Fold in the sour cream.

4. Pour batter in a 9" springform pan and bake on 325 degrees for about an hour and fifteen minutes. No need to be worried about cracking or appearance for this cheesecake seeing as it be piped later. Once cooled, place in fridge until time to assemble cake.

5. Now, let's work on our cakes. We are going to make red and blue velvet cakes in 9" cake pans. To do so, we are going to simply divide the batter and add red food coloring to one half and blue food coloring to the other half. If you wanted to make a few more mini cakes, you could double the recipe and dye each batch, red and blue respectively. This recipe is from an earlier post of red velvet stuffed cupcakes.

6. In a medium bowl, sift together all of the dry ingredients for the cupcakes: flour, sugar, baking soda, cocoa, and salt. Set aside.

7. In the bowl of a stand mixer add all the wet ingredients: eggs, oil, buttermilk, food coloring, vanilla, and vinegar. Beat until smooth.

8. Slowly add the dry mix into the wet mix and blend for a minute or two until fully incorporated. Pour batter into two greased and floured cake pans.

9. Bake at 350 for 28-33 or until fully done. Test with toothpick. Set aside to cool.

10. Once both the cheesecake and cakes are fully cooled, you can begin to make the white chocolate ganache. Place the white chocolate, slightly broken up, into a double boiler over low heat.

11. Stir and let chocolate melt slowly. Add in the heavy cream and continue to stir over low heat. Once fully melted, continue to stir for about 2 minutes, then remove from heat and allow to cool for about 15 minutes, stirring occasionally while cooling.

12. Time to assemble! Start by using a cookie cutter or I used a biscuit cutter to make 3 " circles. Depending on the exact shape of the pan and cutter, you will yield either three or four of each color. Place the blue circles on a baking rack. Blue cakes will be bottoms and red cakes will be tops, but you can feel free to switch 'em up!

13. Scoop cheesecake into a piping bag fit with a coupler and large round tip. Begin piping on top of each blue cake circle to fill the surface. Continue with all bottoms. Place red circles on top of the cheesecake filling to finish the cake tower.


14. By now, the ganache should be fully cooled. Be sure to place a dish or cookie sheet under the baking rack to catch the drips. Start spooning white chocolate ganache over the cakes and let it drip down the sides.


15. Depending on the thickness you desire, you may want one or two coats of ganache. I did two on mine. After the first coat, pop them in the fridge for 10 minutes and then apply second coat!
That's it! Now you have a perfect patriotic dessert for the 4th of July! Enjoy!


Also featured on: Savory Sunday, Mangia Monday,Moutherwatering Monday, Made from Scratch Tuesday, Tempt my Tummy Tuesday, This Chick Cooks

Thursday, April 7, 2011

Giant Peanut Butter Chocolate Chip Cookie


Welcome to the Autism Awareness section of my blog post for the month of April in honor of my brother! I'm sure most people have heard of autism, but how many people really know what it is? Autism is a pervasive developmental disorder that affects people in every walk of life. It is classified by particular behaviors and difficulty in communications. Not every person with autism presents the same characteristics. People are categorized "on the spectrum" based on levels of functioning. But what's so surprising is how very many people are being diagnosed with autism, asperger's or other disorders on the PDD spectrum. According to a study done two years ago, one child in every 110 children is born with autism. Even more so affrected are boys with a 1 to 70 ratio. Where we live has one of the highest rates of autism in the country; 1 in 94 children born are affected. Those results are staggering when compared with other developmental delays. These reasons, plus many more are simply the beginning of why it's crucial to spread awareness. The more we know, the more we can accomplish.


Now back to our regularly scheduled program... I've been trying to think of a way to share Autism Awareness in my food this month and have come up with some good ideas and some not so good ideas. This simple recipe is merely a fun way to spread awareness with baked goods which feature the colors and symbols of Autism Awareness. Some people call this concoction a cookie pizza and others call it a cookie cake. I'm leaning toward pizza, but either sounds good, because it'll be gone so fast!


Peanut Butter Chocolate Chip Cookie "Cake/Pizza"
This cookie cake is simply a double batch of the peanut butter cookies I previously made here, but I will share the revised recipe.

1 stick butter (softened)
1/2 cup peanut butter ( I used smooth, but chunky would be great too)
1/2 cup granulated sugar
1/2 cup dark brown sugar 1 egg
1 1/4 cup all purpose flour
1/2 tsp baking powder
1/2 tsp baking soda
1/4 tsp salt
1 1/2 cup mini chocolate chips (I used min kisses!)

Chocolate Ganache (for topping)
1 cup of heavy cream
1 1/2 cup chopped chocolate


Giant Cookie

1. Preheat oven to 375 degrees.

2. Cream butter, peanut butter, sugar, and brown sugar in a mixing bowl.

3. Add the egg and continue to beat until fluffy.

4. In a separate bowl, combine flour, baking soda, baking powder, and salt.

5. Slowly add dry mix to peanut butter mix while beating.

6. Stir in chocolate chips.

7. Cover a 16" pizza pan with foil or parchment and spread cookie dough with a lightly greased spatula. I even gave the foil a quick spray before filling the pan just to be sure there had no surprises later...

8. Bake on 350 for 18-23 minutes, until fully cooked through. Remove from oven and let cool.


Ganache

1. Take your chocolate bar and break it up into smaller pieces for easier melting. Spread out the pieces in a large bowl. You can use whatever chocolate you have on hand, but the better the chocolate, the better the results. I used a large milk chocolate bar I had hanging around Valentine's Day.

2. Heat the cream on medium-low. Watch it carefully. It will simmer for a few minutes and then as soon as it reaches a boil, immediately remove it from the heat and pour over the chocolate.

3. Stir the chocolate and cream together until smooth and fully incorporated.

4. Pour the ganache over the cookie and help spread it out to the edges with a spoon or spatula.

5. Then decorate as you desire. You can use candy, marshmallows, other types of melted chocolate or peanut butter, icing, nuts, or whatever toppings you want. I used mini M&Ms in the colors of the autism awareness ribbon. Then just cut a slice and eat!


For more information about Autism, please visit these sites:
Autism Society of America
Autism Speaks
Easter Seals


Remember to Support. Educate. Advocate. for Autism Awareness now and all through the year!
Source: Peanut Butter Chocolate Chip Cookies, previously blogged by me, originally from Stephanie Cooks

Also featured on: Full Plate Thurdays

Tuesday, April 5, 2011

Fruit Salad with Sweet Dressing

April is an important month for me and my family, because April is Autism Awareness Month! For anyone who knows me, you know that I love my family tons! My little brother is very special to me. He's my buddy. And he's autistic.


Throughout the month of April, I hope to share, a little about my brother and about autism, along with many of my posts. As I'm sure many people know, the Autism Awareness ribbon is characterized by puzzle pieces and primary colors. Also, the color "blue" has become a symbol a Autism Awareness through the Autism Speaks insignia. I will be blogging about autism along with my usual recipes for this month. Thank you to everyone in their support of Autism Awareness and spreading the word!


This is a very simple fruit salad which I chose to feature today, because its colors are similar to that in the Autism Awareness Ribbon. I hope to feature some foods that highlight the color themes for Autism Awareness, as well as, some of my brother's favorite foods in the up coming weeks.


6 strawberries, sliced
4 oz blueberries
1/2 cantaloupe, diced
1/2 pineapple, cubed
1 bunch of green grapes
1 bunch of red grapes
4 tbsp honey
2 tbsp lemon juice
1 tsp lime juice
2 tsp vanilla
2 tbsp cinnamon

1. Rinse all of the fruit and pat dry with paper towels. Place all the fruit in a large bowl.

2. In a small bowl, add honey. Slowly, add in lemon and lime juice while stirring.

3. Stir in vanilla and cinnamon.

4. Drizzle the dressing over the fruit and lightly toss until well coated. Serve chilled.

Tuesday, March 29, 2011

Anginettes


To really know oneself, I feel it's important to know where you came from. Being Italian is as much a part of my past heritage as it is a part of my current lifestyle. Many of the foods I make are Italian because that's the food I grew up learning to cook. I'm proud of my heritage and hope to pass on our family traditions and recipes, along with our love of food, family, and values. It's crucial for younger generations to carry on these traditions and appreciate for culture. So for this month's What's Baking challenge, I choose to Bake from Your Heritage.

There are certain foods that are very always made by my family, because they are recipes passed own through generations. This is one of them. These cookies, anginettes, were made by my Great Aunt Matt long before I was born. They're present at every family party and get-together I can remember. Some relatives in our family have a particular dish that is "their' thing". This was Aunt Matt's cookie. My grandmother has a particular cookie that is hers too, however it's not baked so we'll save that for some other time. Enjoy this favorite Italian cookie, from my home to yours!

Anginettes (Italian Cookies with Lemon Glaze)

2 1/2 pounds flour
1 tbsp baking soda
5 1/2 tsp baking powder
1 1/2 cup sugar, plus 1 tsp
1 1/2 tsp vanilla
6 eggs, beaten
1 cup whole milk
3/4 cup crisco


1. In a large bow, mix together the dry ingredients; flour, baking soda, and baking powder. Set aside.

2. In the bowl of a stand mixer, combine the sugar, vanilla, eggs, and Crisco.

3. Alternately add dry ingredients and milk a little bit each time until batter is smooth and not sticky.

4. Roll dough into 1" balls and drop on a cookie sheet lined with parchment paper about an inch apart.

5. Bake in a 350 degree oven for 10-15 minutes. Place tray on bottom rack of oven then halfway through baking rotate to top rack and replace with a new filled cookie sheet.

6. Cookies are done when slightly golden brown. Set aside to cool while making lemon glaze.

*Yields about 7-8 dozen one inch round cookies*


Lemon Glaze

3 1/2 -4 lbs confectionery sugar
juice of 5-6 lemons
a few tbsp cold water
sprinkles/nonpareils

1. Mix together the sugar and lemon juice.

2. Add a few drops of cold water, little bits at a time, until the icing is thick an has no lumps.

3. Dip cookies upside down in glaze to coat the cookie tops and place on wax paper to dry.

4. Add sprinkles before the glaze hardens. Enjoy!!

Stay tuned for the full What's Baking Round-up in the next few days!